A Tactile Book Made by Hand
Why make a book with your own hands? Why is it important for children with visual impairments?
For those who work with such children, the answers are obvious: the development of compensatory abilities and fine motor skills.
A Tactile Book as a Map of the World
Any book, from the moment it comes into existence, becomes a map of the world for its reader. And it does not matter whether one reads it with the eyes or by touch. In both cases, books open something new, introduce fascinating characters, and lead into the mysterious world of imagination. A tactile book is no exception, and in the case of a young child, it is a wonderful opportunity to help them acquire useful skills.
The surrounding world in such a book is created from different materials, and modern technologies make it possible to enrich it with sounds. Just imagine how surprised a child will be when their fingertips feel a soft, long strip imitating a path in a park or forest. Or a fluffy vibrating ball of fur that, once touched, comes alive as a purring cat.
A tactile book can be not only a way of discovering the world around us but also a pleasant memory. An adult, sensing the familiar smells of paper and glue, feeling the softness of book cardboard or the pliability of modern craft materials, may recall making something similar with parents or friends—at school, at home, on a summer terrace, in a workshop, in the evening or early morning. And perhaps this will become one of the brightest memories of childhood.
Getting Started!
A tactile book can not only be bought—there is a huge variety available today—but also, as mentioned above, made with your own hands. For this, you will need a wide range of materials, as well as a storyline for the book and a clear purpose for its creation. Whether your story is a fairy tale, an adventure, or a learning aid may influence the choice of materials, while the purpose of the book will affect how much time is needed to make it.
Materials for Creating a Book
To make a tactile book, you will need the following materials:
- For the cover, binding, and some of the pages, the best choice is bookbinding cardboard—dense and reliable. If this is not available, corrugated cardboard or two to three layers of paper glued together will also work.
- To create textures and tactile relief, you will need felt, natural or artificial leather or suede, silk, linen, cotton, velvet, corduroy, or any other fabric with a pile. You will also need some buttons, beads, sheets of sandpaper, and similar materials.
- Modern materials can complement traditional ones (such as fabric and leather). For example, EVA foam is a lightweight, flexible material with good cushioning properties. Or format sheets of Soft Foam with memory effect, which easily take the desired shape.
- Contours and volume in the book can be created with acrylic Puffy, standard PVA glue, special adhesives for complex or heavy materials, and a glue gun for hot glue.
- To secure tactile elements to the page, you may need Velcro tape, sewing or office pins, eyelets with setting tools, buttons, and various cords.
- For Braille inscriptions, you may need a portable Braille printer or a stamp—a manual device or stencil for embossing Braille dots on paper or plastic.
- To test how successful the concept and structure of your tactile book are, it is necessary to create a draft version or mock-up. Instead of real Braille printing—which requires skills, significant effort, and time—you can mark the places where Braille will go with drops of glue or small buttons. This will not be real Braille text, but it will give an idea of the tactile effect and allow you to test how raised text is perceived.
- A tactile book is quite fragile and prone to wear. To reduce fragility and protect it from frequent opening and turning of pages, some reinforcement is required. Ordinary laminating film is not always suitable for such books: although it makes the surface more durable, it also causes fingers to slide, which reduces the tactile sensation of the book’s structure. As an alternative, the edges and corners of the book can be reinforced with fabric or other materials. In addition to consumable materials, you will also need tools: an X-Acto knife, a rotary cutter for patchwork, scissors for fabric, paper, and polymer materials, a tape measure or ruler, an iron, and a set of bookbinding tools, including a knife and needles.
Draft and Protection
The creation of a tactile book can be supported by various technologies: manual, printing and thermal, digital, and mechanical.
Manual tactile methods
- Blind embossing for producing a clear relief without ink.
- Hot foil stamping for decorative elements and inscriptions.
- Felt, fabric, and textile appliqués, attached by sewing or gluing.
- Use of EVA foam and homemade stamps for shaping forms.
- Reliefs and contours were built up manually with glue.
This technology is best suited for creating prototypes/drafts and children’s tactile books.
Printing and thermal technologies
At this level, elements made of wood, acrylic, and other solid materials can be processed with laser and milling techniques.
| Technology | Purpose | Equipment and Materials |
| Swell Paper | Creating raised images using heat | Laser printer, Swell Touch thermal printer for tactile graphics |
| Laser cutting | Precise cutting and engraving of details | Laser cutter, Scalable Vector Graphics (SVG)/ Adobe Illustrator Artwork (AI) files |
| Digital cutting | Contour cutting of paper and fabric | Cricut, Silhouette cutting plotters |
Digital and mechanical processing
- Creation of 3D tactile inserts using 3D printing technologies such as Fused Deposition Modeling (FDM) with materials like PLA (Polylactide) and TPU (Thermoplastic Polyurethane).
- CNC (Computer Numerical Control) machines for engraving and cutting dense cardboard or other hard-to-process materials.
Software
- Inkscape, a free vector graphics editor.
- LightBurn, universal software for laser cutting.
- Fusion 360 by Autodesk is, cloud-based software for 3D design.
Idea, Storyline, and Structure of the Book
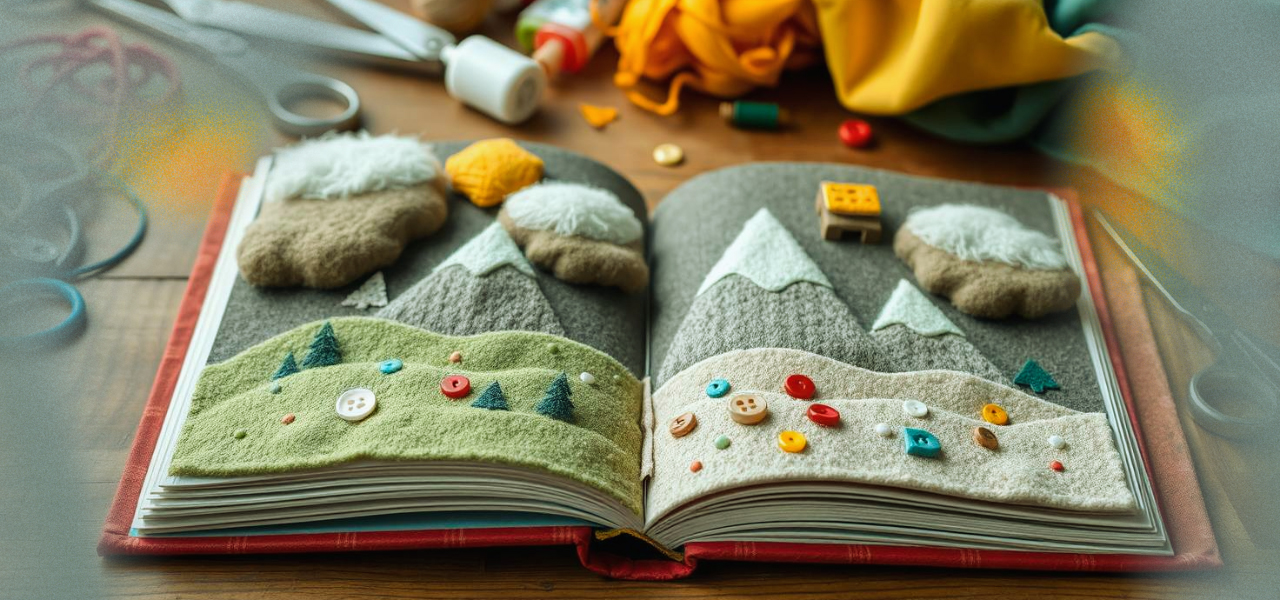
The creation of a tactile book begins with an idea or storyline and the development of a mock-up. Think of 3–5 scenes, one for each page. For example: a path in a night park, a nearby house, the Moon in the sky, the planet Saturn and its rings, a sea voyage, or a city map.
Next, move on to the foundation of any book—its pages. Cut them out of bookbinding cardboard in the desired size. Use an X-Acto knife, a rotary cutter, or heavy-duty scissors.
After this, begin working on reliefs and contours. Apply them to the pages using acrylic Puffy or a glue gun, and allow them to dry.
Then, proceed to creating the book’s textures. Glue cutouts from fabric, leather, and other materials: elements of grass, sky, the Moon, a road, and anything else required by the storyline. To fix these elements, use PVA glue or adhesives suitable for specific surfaces.
Now it is time to add Braille inscriptions and regular text for those who will help read the tactile book. In addition, you can add interactive elements: pockets and flaps, pop-up mountains, sounds of cars, talking animals, or even a QR code if the book is paired with software.
Finally, create the binding, securing the pages in whichever way works best, but remember: the book must withstand repeated handling and opening.
The final step is editing, just as with any regular book: discussions with the author, clarification of details, and agreeing on the finished result.
Important Additions
- When creating a tactile book, always keep in mind who it is for and who will be the main reader. A scientific book must differ from one intended for small children, and a college or university textbook cannot resemble an ordinary storybook.
- Choose simple, concise forms and avoid overloading the book with small details that cannot be perceived by fingertips.
- Be sure to include a tactile key (introduction) at the beginning of the book.
- Plan your choice of materials in advance to emphasize contrasts between tactile zones, especially those located close to each other.
- Test the book with real readers—blind or visually impaired users. Remember that the most important thing is that the book should be both usable and user-friendly.
- Safety is another crucial aspect. Pay attention to which elements of the book could be dangerous for small children—or even adults. Avoid excessive use of small parts, and do not overload a page with too many elements, especially those difficult to perceive by touch.
Safety in Creating a Tactile Book
Much of what follows may seem obvious, but even the obvious is worth repeating.
Organizing the workspace:
- Keep the work surface clear.
- Store all tools, especially dangerous ones (X-Acto knife, glue gun), separately from materials.
- After finishing work, put away tools and materials—do not leave them lying on the table.
Working with scissors and knives:
- These sharp tools (scissors, craft knives, X-Acto knives) are not suitable for children. If children are working with you, use scissors with rounded tips.
- Use a flat, stable surface for cutting materials.
Use craft or rotary knives only on a cutting mat, cutting away from yourself and never toward your hands. - Keep the blades of craft, rotary, and X-Acto knives closed when not in use. The same applies to regular scissors.
Working with needles and sewing tools:
- Store needles in a closed needle case; magnetic ones may pose risks.
- Sew tactile elements in a well-lit environment.
- After finishing, make sure no needles or pins are left on the floor, on the table, or inside the material.
Use larger sewn-on details that cannot be easily pulled off.
Working with glue and a glue gun
- Place a heat-resistant mat under the glue gun, and use a removable base for other types of glue.
- Keep the glue gun out of children’s reach while in use.
- Hot glue can cause burns if it drips on the skin—watch carefully where drops fall.
- Have first-aid supplies for burns nearby.
- Whenever possible, use safer types of glue or double-sided tape.
Working with small details
- Parts smaller than 2.5 cm are dangerous for children under three years old—replace them with larger ones.
- Check that small elements (beads, buttons, pins, etc.) are securely attached.
Good luck with your creation—may it turn out well!